
Autoclosures in Swift
In Swift, an autoclosure offers a way to write cleaner code by leaving curly braces out.
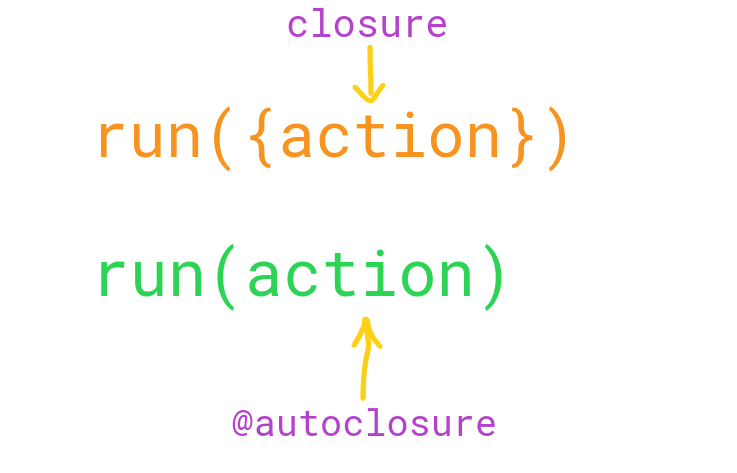
To create an autoclosure, use the @autoclosure modifier in front of the closure type.
An autoclosure itself does not accept any arguments.
When an autoclosure is called, it simply returns the value of the expression returned by the expression wrapped inside of it.
Before diving any deeper let’s see what Apple Developer Docs says about autoclosures:
It’s common to call functions that take autoclosures, but it’s not common to implement that kind of function. Overusing autoclosures can make your code hard to understand. The context and function name should make it clear that evaluation is being deferred.
Apple Developer Documentations
This highlights the fact that autoclosures are rarely that beneficial.
Most of the time you should not implement functions using autoclosures.
However, they can be useful in some specific cases and they are worth understanding.
In this guide, you are going to learn how to use autoclosures for writing more readable code.
What’s the Benefit of an Autoclosure
On rare occasions, it is syntactically convenient to use an autoclosure when working with a function that takes a closure argument.
This is because using an autoclosure allows you to omit curly braces {}.
This is best demonstrated by an example.
Let’s create a function that takes a closure as its argument:
func example(_ perform_action: () -> Void) {
    perform_action()
}
Let’s call this function with a closure that prints out a string.
Remember, because you are dealing with closures, you need to wrap the closure around a set of curly braces:
example({
    print("Hello, world!")
})
This works.
However, one could argue the syntax is a bit off because you need to use curly braces.
Wouldn’t it be nicer if you could write example(print(“Hello, world”)) instead?
This is where you can use an autoclosure.
To turn the function into an autoclosure, use the @autoclosure modifier in front of the type of closure.
func example(_ perform_action: @autoclosure () -> Void) {
    perform_action()
}
Now you are able to call the function without curly braces around the closure.
example(print("Hello, world"))
Let’s take a deeper look at how it works.
The function example expects a closure of type () -> Void as its argument. However, in the above piece of code you pass in a print function that returns Void…? Thus there is a type mismatch, isn’t there?
This is where the magic happens.
The type mismatch does not cause issues because the @autoclosure wraps print(“Hello, world!”) inside a closure. This changes the type of the argument from Void to () -> Void.
When the outer function calls the closure, it simply returns what is wrapped inside the closure.
Now that you understand how an autoclosure works in Swift, let’s see a real-life example of using one.
Assert Statements: Autoclosures in Action
You might be familiar with the built-in assert function in Swift:
assert(1 == 2, "This condition failed")
This function is used in unit tests to check if a condition is met.
Let’s take a look at the implementation of assert in Apple Developer Docs:

The parameters condition and message are both marked as @autoclosure.
As you learned, autoclosures let you omit curly braces around the closure function.
Thus, using an autoclosure in the assert() statement is a trivial choice from Apple developers.
Take a look at this piece of code:
assert(1 == 2, "This condition failed")
Now compare this to how the assert() statement would look if the closures were not autoclosures:
assert({ 1 == 2 }, { "This condition failed" })
As you can see, the latter looks worse because it has those excess curly braces everywhere.
Bonus: Why Assert Uses Closures in the First Place?
The above example might leave you wondering why does assert expect closures in the first place.
Couldn’t the condition and message be a regular Bool and a String?
By using closures, you can delay the evaluation of the function. This is because closure is not run before it is called.
And if there’s no need to run the closure, Swift saves resources by not running the closure.
Also, the assert() function call only works with debug builds.
So if you make an assert call in an invalid context, there is no reason to evaluate condition or message as it won’t need the result anyways.
But if condition and message were not closures they’d always be evaluated no matter what.
This would waste resources for no reason.
In short, when implementing assert, Apple decided to save resources by accepting closure arguments that are evaluated only when necessary.
To make the syntax clean, they replaced closures with autoclosures.
Conclusion
Today you learned how to use autoclosures in Swift.
To recap, an autoclosure wraps an argument around a closure.
An autoclosure itself does not accept arguments. When calling an autoclosure, it returns the result of the expression wrapped inside of it.
It is common to call functions that use autoclosures but they are something you rarely need/want to implement yourself.
Using a lot of autoclosures can make code confusing.
In some very specific situations, it might be syntactically beneficial to use an autoclosure.