
Have you tried one of those AI art-generating tools but got an image as bad as this one?
And did you expect to get something of this caliber?
So what went wrong?
The main reason why your AI-generated art fails is because of poor input design.
When you use AI to generate images, you need to be very specific as to what kind of image you want to produce. It’s not enough to just say “Cat playing”. The powerful AI image generation models can’t save you if your inputs are bad.
This is a comprehensive guide to creating stunning art with AI. You will learn the basics of input design (also known as prompt engineering).
I’ll also give you keyword lists associated with artistic styles, techniques, and more. You can use these to fine-tune the AI art.
I’m using Stable Diffusion 2.0 to generate the images in this guide.
Input Design: How to Create Images with AI
To start generating images with AI, you need to choose an AI art generation model. The most notable models are:
But these models aren’t that impressive unless you learn how to use them.
Poor input design is the number one reason why you’re bad images from AI image generators. Luckily, learning input design (or prompt engineering) is easy.
And don’t get me wrong here. Sometimes you might be able to generate stunning AI art without thinking about the prompts at all!
There are also some tools that build prompts for you. There are even marketplaces that sell prompts that generate quality images with AI.
But because input design is such an easy skill to learn, it makes sense to spend some time drilling it. Some even say that input design is one of the careers of the future!
Let’s get started with input design to create those amazing AI-generated images.
The 4 Steps of Input Design
AI image generation works by using simple text prompts.
The AI asks you for input, such as “An image of a cat”. Then it takes a couple of seconds to generate an image that best matches your input.
To make the most out of AI image generators, you need to know how to craft these inputs in the right way.
Obviously, there are different approaches and templates you can use to write inputs for AI. One simple way to construct a prompt is by using the following structure:
Category, Description, Style, Composition
Here’s an example input I gave to Stable Diffusion 2.0 image generation model:
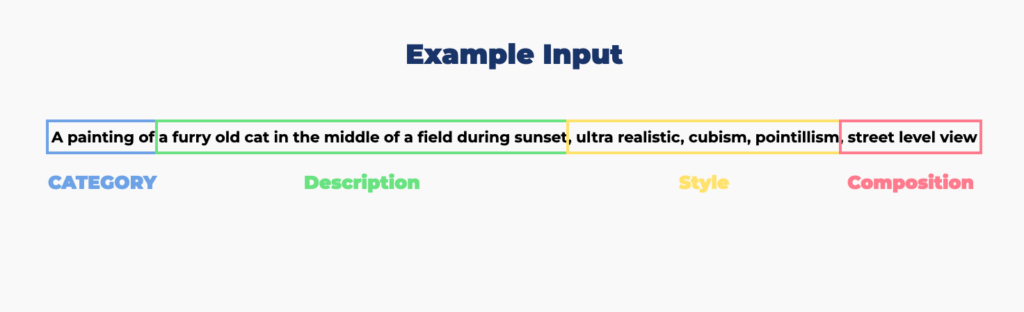
As you can tell, I’ve carefully used specific terms to describe the output image best. Here’s what the AI gave me:
It is more or less exactly what I wanted!
Next, let’s take a closer look at the different parts of the input, how you can create those, and some keyword lists and names to include in the prompts.
1. Category
To create a piece of art with AI, you need to decide what type of image you want to see.
Is it a photograph, painting or 3D render?
For example, if you want to create a painting, start with:
A painting of…
2. Description
After deciding what art piece you want to generate, it’s time to describe the subject, its attributes, and the scene.
The better you describe your object, its attributes, and its environment, the better the output!
For example, let’s say we’re looking for a painting of a cat.
Let’s use a poorly descriptive prompt at first:
A painting of a cat
Here’s what the output might look like:
Well, it actually looks quite nice. But it’s also very basic.
Let’s see what happens when we fine-tune the input to be more descriptive:
A painting of a furry old cat in the middle of a field during sunset
Here’s the output:
3. Style
The style of art you’re looking to generate is in a key role. Without specifying the style of art, detail, and lighting, the outputs will be quite arbitrary.
In this section, you learn how to affect the style of AI art. I’ve split this part into three sections:
- Lighting
- Detail
- Art Style
In each section, you’ll find a bunch of keywords you can include in your inputs.
3.1. Lighting
Here is a list of lighting-related terms you can use to specify the lighting of your scene. Don’t forget to be creative and add more lighting items to your list 🙂
💡 Accent Lighting, Ambient Lighting, Backlight, Blacklight, Blinding Light, Candlelight, Colored Lighting, Concert Lighting, Crepuscular Rays, Dark Lighting, Dimmer Lighting, Direct Sunlight, Dusk, Edison Bulb, Electric Arc, Filtered Lighting, Flood Lighting, Fire, Fluorescent, Glowing, Glowing Radioactively, Glow-Stick, LED Lighting, Lava Glow, Mood Lighting, Moonlight, Natural Lighting, Neon Lamp, Nightclub Lighting, Nuclear Waste Glow, Outdoor Lighting, Quantum Dot Display, Reflective Lighting, RGBW Led Lighting, Spotlight, Strobe, Sunlight, Task Lighting, Ultraviolet, Up Lighting, Vintage Lighting, Warm White Lighting, White Lighting, Wireless Lighting, X-Ray Lighting, Zonal Lighting, Dramatic Lighting, Soft Lighting, Laser Lighting, Moving Head Lighting, Architectural Lighting, Gobo Lighting, Pixel Lighting, Wash Lighting, Pixel Mapping Lighting
For example, let’s generate the cat painting in moonlight and firelight:
A painting of a furry old cat in the middle of a field during sunset, moonlight, fire
Output:
3.2. Detail
The detail seems obvious—you want to tell the AI to generate as sharp an image as possible.
But there are many factors that contribute to the detail of a photograph. The detail depends on the type of digital lens and rendering options.
Here are a bunch of detail-related keywords to use:
💡 8K UHD, Analog Photo, Arnold Render, Bokeh, CGSociety, CGI, Cinema4d, Depth Of Field (DOF), DSLR, Film Photography, 100mm, Grainy, Houdini Render, Highly Detailed, Lumen Reflections, Megascans, Overglaze, Octane Render, Polaroid, Realistic, Raytracing, Studio Quality, Ultra Realistic, UnReal Engine, Volumetric Fog, Vray.
For example, let’s turn the cat painting into an ultra-realistic painting with the following input:
A painting of a furry old cat in the middle of a field during sunset, ultra-realistic
Output:

3.3. Art Style
One major part of proper input design is name-dropping. Knowing different artistic styles, techniques, or eras can help you control the output of the AI-generated art piece.
Here are some historical art styles:
💡 Abstract, Abstract Expressionism, Art Deco, Art Nouveau, Art Povera, Baroque, Byzantine, Conceptual Art, Constructivism, Contemporary, Cubism, Dadaism, De Stijl, Fantasy, Fauvism, Fluxus, Futurism, Geometric Abstraction, Gothic, Hyperrealism, Impressionism, Kinetic Art, Land Art, Luminism, Medieval Art, Minimalism, Modernism, Neoclassicism, Op Art, Photorealism, Pointillism, Pop Art, Pop-Op, Post-Expressionism, Postmodernism, Pre-Raphaelites, Realism, Renaissance, Rococo, Romanticism, Surrealism, Symbolism, Suprematism.
And here’s a list of artistic techniques:
💡 Acrylic Painting, Airbrushing, Award Winning, Character Design, Collage, Color Page, Concept Art, Dry Brushing, Divine, Digital Art, Digital Painting, Encaustic Painting, Elegant, Evocative, Featured on Pixiv, Fine Art, Fresco Painting, Glazing, Gouache Painting, Golden Ratio, Lino-Cut Printmaking, Monotype Printmaking, Oil Pastel, Pastel Painting, Precise Line-Art, Printmaking, Relief Printing, Scratchboard, Sketching, Smooth, Soft, Stenciling, Surreal, Symmetry, Tarot Card, Tempera Painting, Tenebrism, Trending on Artstation, Watercolor Painting, Watercolor Sketch, Woodcut Printmaking, Zentangle.
You can of course specify the artistic materials being used:
💡 Acrylic Gesso, Acrylic Paint, Canvas, Canvas Board, Charcoal, Chalks, Clay, Colored Pencils, Ceramic, Cartridge Paper, Calligraphy Pens, Drawing Board, Fabric, Easel, Encaustic, Fixative Spray, Gels, Gold Leaf, Gouache, Graphite, Glass, Glazing Liquid, Gesso, Ink, Ink Pens, Linseed Oil, Markers, Mediums, Metal, Oil-Based Markers, Oil-Based Paint Sticks, Oil Paint, Oil Pastels, Pallet Knives, Paper, Pastel, Plaster, Sandpaper, Sketch Pad, Sketch Books, Spray Paint, Stone, Turpentine, Varish, Yarn, Wooden Panel.
For example, let’s take a cubistic approach to paint the image of a cat.
A painting of a furry old cat in the middle of a field during sunset, ultra-realistic, cubism
Output:
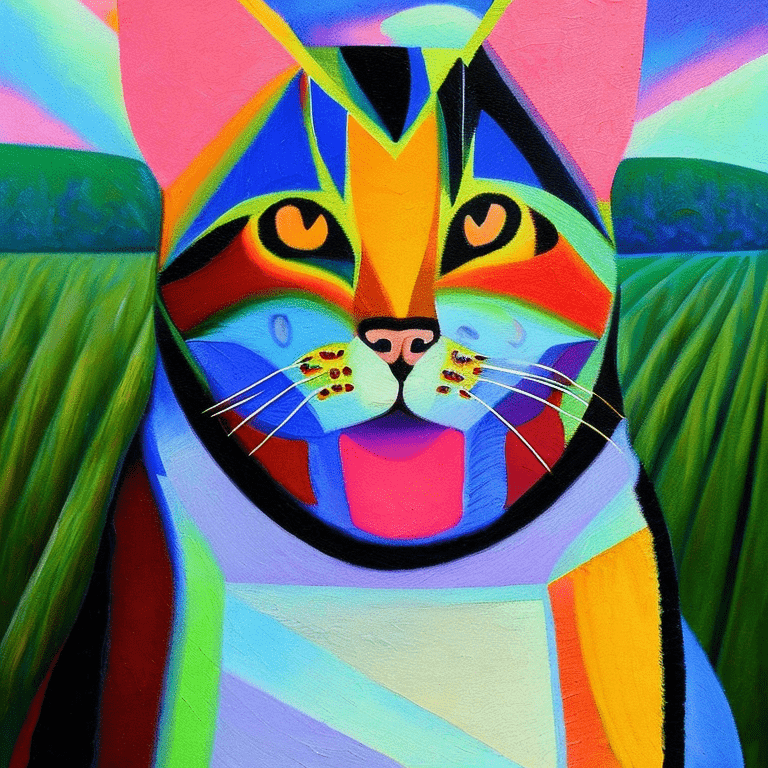
As another example, let’s make the painting both cubistic and pointillistic with the input:
A painting of a furry old cat in the middle of a field during sunset, ultra-realistic, cubism
Output:

4. Composition
Last but not least, you might want to specify the image composition for your art piece. This involves choosing the measurements of the output image, camera view, and resolution.
4.1. Aspect Ratio
To specify the measurements of an AI-generated image, you need to choose an aspect ratio. The aspect ratio varies based on what kind of environment you want to generate the image.
In case you’re unfamiliar with the term, the aspect ratio is the proportion of an image’s width to its height. It is often represented as two numbers separated by a colon, such as 4:3 or 16:9.
For example, a 4:3 aspect ratio means that the width of the image is 4 units and the height is 3 units. A 16:9 aspect ratio, on the other hand, is a rectangle with a width of 16 units and a height of 9 units.
Here’s a list of common aspect ratios (with short explanations):
1:1 – Square
3:2 – Classic 35mm Film (used in photography)
4:3 – Standard Definition TV
5:4 – Monitors and some older cameras
16:9 – High Definition TV and Widescreen
21:9 – Ultrawide monitors
4.2. Camera View
When taking or painting a picture, you need to choose the point of view. This is no different in input design.
To generate art with a specific camera view, you can use some of the following keywords:
💡 Aerial View, Bird’s Eye View, Bokeh, Close-Up, Crane Shot, Drone shot, Dutch Angle, Extreme Close-Up, Extreme Long-Shot, Fisheye, High-Angle Shot, Jib Shot, Landscape, Low Angle, Long Shot, Massive Scale, Mid-Shot, Over-The-Shoulder, Panoramic, Point-Of-View, Snapshot, Steady Cam, Stop-Motion, Street Level View, Tilt-Pan, Tilt-Shift, Time-Lapse, Tracking Pan, Tracking Shot, Ultra Wide-Angle, Worm’s Eye View, Wide-Angle, Zoom-In, Zoom-Out.
4.3. Resolution
Last but not least, the image quality matters too. To consider this, tell the AI what kind of resolution you want.
You may have heard of resolutions of 4k, 8K, RGB, and such.
Here is a long list of keywords associated with image resolution. (Some terms overlap with the detail-related keywords from the detail section earlier).
💡 4K, 8K UHD, Bit-depth, Bitmap Images, Color Depth, Color Space, CMYK, Compression, Depth of Field (DOF), DPI, Gamma Correction, Gamma Compression, Grayscale, High Dynamic Range (HDR), High Resolution, H.264 Compression, H.265 Compression, Interpolated, Low Resolution, Metafile Image, Pixelated, PPI, RGB, Raster Image, Highly Detailed, Studio Quality, 2D Images, 3D Images, Lossless Compression, Lossy Compression, Ultra Realistic, Vector Image.
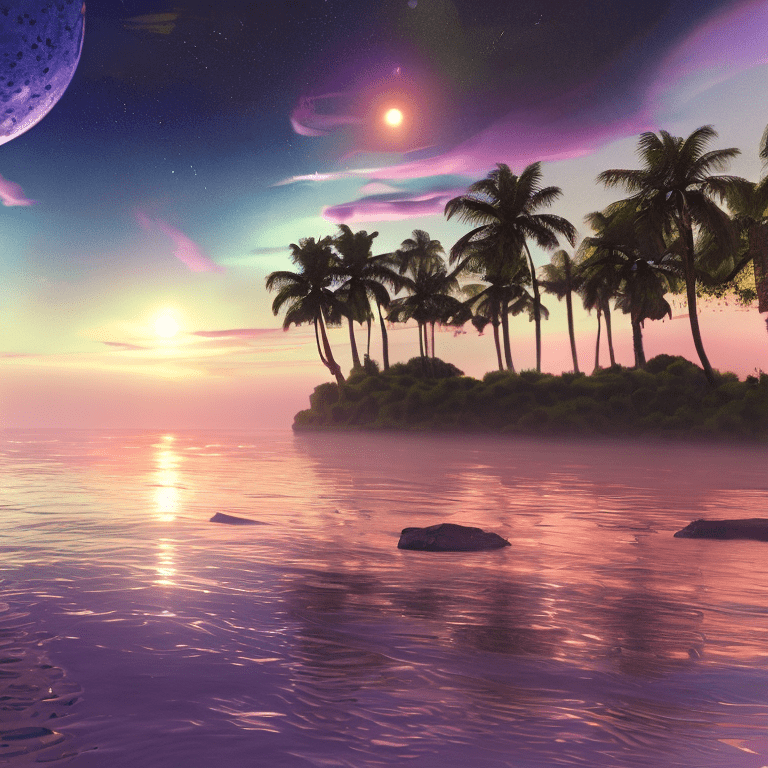
Let’s generate one more cat painting. This time, let’s choose a street-level view as the camera view in our composition.
Input:
A painting of a furry old cat in the middle of a field during sunset, ultra-realistic, cubism, pointillism, street-level view
Output:
Conclusion
AI is capable of generating stunning pieces of art in a matter of seconds. To do this, you can use models like DALL-E, Stable Diffusion, or MidJourney.
But to truly harness the power of AI, you also need to know how to write the text inputs in the right way.
If you poorly describe your art piece, you (often) get a bad result. On the other hand, if you’re good at engineering the prompts, you can generate stunning pieces of art—similar to the ones you see in demos and community showcases.
When you generate images with AI, split your input into four parts:
- Category
- Description
- Style
- Composition
Also, remember that AI understands the inputs quite well. AI art generation is not an exact science! If you specify aspect ratio before artistic style, you will probably end up with a good result.
Remember to experiment, read guides, watch tutorials, and more importantly, find prompts that best match your use cases!
Thanks for reading. Happy image-generating!
Read Also: What Is AI?